10 Easy Soft Mocha Hair Ideas

•

Stepping into the realm of soft mocha hair is like wrapping your style in a cashmere sweater—it is comfortable, endlessly chic, and possesses a subtle richness that never goes out of style. This color profile sits beautifully in the sweet spot between deep espresso and light milk chocolate, offering a balanced, neutral tone that works to soften harsh features while adding a healthy-looking sheen to your strands. Whether you are looking to tone down a brassy blonde or elevate a flat, dark shade, soft mocha offers a dimension that feels natural rather than forced. It is a favorite among those who value a “lived-in” aesthetic, where the color looks just as vibrant weeks after your salon appointment as it does the day you leave. By integrating various techniques—from melted roots to delicate, barely-there face-framing pieces—you can customize this look to suit your specific skin tone and lifestyle, ensuring a sophisticated finish that feels both modern and timeless.
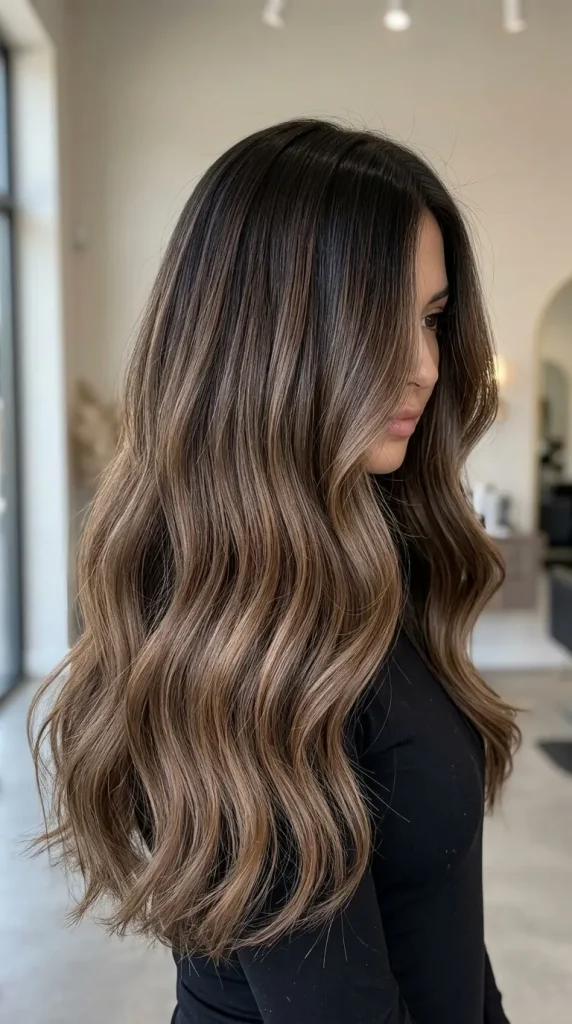
1. Velvety Mocha Melt

The mocha melt is the gold standard for a seamless, low-maintenance transition. By keeping the roots a deeper, truer espresso and melting into a softer, lighter mocha toward the mid-lengths and ends, you create an illusion of incredible depth and volume. This style is perfect for those who want to avoid the visible regrowth line that comes with single-process color. The softness of the blend ensures that as your natural hair grows out, it blends harmoniously with the lighter mocha tones, making this one of the most practical and elegant ways to wear the shade.

How to Make

Start by applying a permanent deep coffee-toned base color to the roots, extending it roughly three to four inches down the hair shaft. Once that is set, apply a demi-permanent soft mocha shade to the remaining length. Using a wide, flat blending brush, feather the two colors together at the transition zone to eliminate any harsh lines. The key is to keep the transition gradual. After rinsing, apply a shine-enhancing gloss to lock in the color and create that velvety, high-end finish that defines this specific look. Finish with a round-brush blow dry to ensure the blend is perfectly visible and smooth.

Things Needed

  • Deep espresso permanent color
  • Soft mocha demi-permanent dye
  • Blending brush
  • Shine-enhancing clear gloss
  • Sectioning clips
  • Blow-dryer and round brush
  • Color-safe moisturizing shampoo

2. Sun-Kissed Mocha Highlights

If you want to maintain a primarily dark appearance but crave a touch of brightness, sun-kissed mocha highlights are your best friend. This technique involves painting very fine, subtle ribbons of a lighter, warmer mocha through a darker base. Because the highlights are only one or two shades lighter than your natural color, the effect is understated and incredibly natural. It mimics the way hair lightens after a long summer, giving you a fresh, youthful look that brightens the complexion without requiring the heavy maintenance or damage associated with traditional high-contrast blonde highlighting.

How to Make

Section your hair into manageable parts. Using a balayage technique, hand-paint thin, diagonal sections starting from the mid-lengths down to the ends, ensuring the pieces closer to your face are slightly lighter. By avoiding a heavy root application, you maintain a soft, lived-in feel. After the lightener processes to the desired soft mocha level, rinse and apply a warm-toned toner to bridge the gap between your natural base and the new highlights. This step is crucial for achieving that “sun-kissed” warmth rather than an ash-toned look. Use a lightweight, hydrating leave-in conditioner after styling to maintain the health of the highlighted strands.

Things Needed

  • Clay-based lightener
  • 20-volume developer
  • Warm mocha toner
  • Balayage paddle
  • Tail comb
  • Leave-in hydrating conditioner
  • Microfiber towel

3. Cool-Toned Mocha Ash

For individuals with cool or olive skin tones, the cool-toned mocha ash is a refreshing departure from the usual warm, chocolatey browns. This shade leans heavily into neutral, slightly greyish undertones, creating a sophisticated and edgy look. It is an excellent way to neutralize unwanted red or orange tones that often appear in dark hair. The result is a muted, “expensive” color that looks particularly striking against cool-toned clothing like navy, black, or crisp white. This style is polished, modern, and provides a clean, matte finish that makes the hair look incredibly sleek and well-groomed.

How to Make

Begin by performing a color correction if your hair has existing warmth. Use an ash-based mocha dye that is formulated to cancel out red pigments. Apply the color evenly from roots to ends, ensuring thorough saturation. Because cool tones can sometimes look flatter than warm tones, you may want to incorporate a few “lowlights” of a darker, neutral brown to add dimension back into the hair. After the coloring process is complete, it is essential to use a purple-tinted shampoo once a week to prevent the warmth from creeping back in, which helps keep the cool mocha aesthetic crisp and vibrant.

Things Needed

  • Ash-toned mocha dye
  • Purple shampoo
  • Neutral brown lowlight cream
  • Tint brush and bowl
  • Protective gloves
  • Deep conditioning treatment
  • Professional-grade hair clips

4. Creamy Mocha Swirl

The creamy mocha swirl is all about dimension. This look features a base of dark, rich mocha interspersed with thick, intentional ribbons of a lighter, creamy milk-chocolate shade. Unlike standard highlights, these swirls are designed to be chunky and visible, creating a dynamic, multi-tonal effect that looks fantastic when styled in loose curls or a braided updo. This style is incredibly playful and works to break up the solidity of dark hair, adding a sense of movement and volume. It is an ideal look for those with naturally thick hair who want to showcase the texture and body of their locks.

How to Make

Divide your hair into larger, thicker sections rather than thin weaves. Paint your light, creamy mocha shade in broad strokes down these sections, keeping the root area dark to maintain the depth. Use foil to wrap each section, which will allow for a more precise lift and a cleaner, lighter color deposit. Once the lighter pieces are developed, rinse everything thoroughly. Finish the look by applying a glossing spray that adds a mirror-like shine; this will help the “swirls” of lighter mocha stand out sharply against the darker, rich mocha base, giving you a high-fashion, multidimensional appearance.

Things Needed

  • Creamy milk-chocolate lightener
  • Rich dark mocha permanent color
  • Aluminum foils
  • Glossing spray
  • Styling mousse for volume
  • Wide-tooth comb
  • Heat-protective thermal spray

5. Subtle Mocha Face-Framing

Sometimes, you do not need to color your entire head to achieve a major impact. Subtle mocha face-framing involves focusing the color application exclusively on the hair strands that surround your face. By lifting these specific pieces to a soft, warm mocha shade, you effectively “highlight” your features, drawing attention to your eyes and cheekbones. This is a fantastic option for someone who is hesitant about a full-head color change or someone who wants to freshen up their look with a minimal time investment. It is sophisticated, modern, and provides a soft, glowing frame for your face.

How to Make

Identify the “money piece” sections: the front-most strands of your hair. Use a fine-tooth comb to isolate these sections, then apply your light mocha hair color or lightener starting from about an inch from the root. Use a foiling technique to ensure the color processes evenly. After reaching the desired shade, rinse and apply a clear, hydrating gloss to those pieces to ensure they are as shiny as possible. Since you are only coloring a small portion of your hair, you can afford to use a slightly higher-quality conditioning treatment on these sections to ensure they remain healthy and vibrant.

Things Needed

  • Light mocha hair dye
  • Foils
  • Fine-tooth comb
  • Clear hydration gloss
  • Sectioning clips
  • Leave-in hair oil
  • Microfiber towel

6. Glossy Mocha Glaze

The glossy mocha glaze is less about changing your base color and more about enhancing the health and luster of your current brunette shade. This is perfect for those who already have a natural mocha hue but find it looking a bit dull or faded. A high-shine glaze acts as a semi-permanent treatment that deposits pigment and seals the hair cuticle, resulting in a deep, reflective, and incredibly healthy look. It is the ultimate “my hair, but better” treatment, providing a glass-like finish that makes your hair look like it belongs in a shampoo commercial.

How to Make

Start with clean, damp hair. Apply a professional-grade mocha glaze formula, starting at the scalp and working through to the ends. Use a wide-tooth comb to ensure the product is evenly distributed, as any patches will be visible in the final result. Allow the glaze to process according to the manufacturer’s instructions—usually between 15 to 20 minutes. Rinse with cool water, as this helps to close the hair cuticle and lock in the shine. Because this is a glaze, it will naturally fade over 4 to 6 weeks, making it an excellent, low-commitment way to experiment with the mocha aesthetic.

Things Needed

  • Professional-grade mocha glaze
  • Wide-tooth comb
  • Cool water source
  • Sulfate-free shampoo
  • Detangling mist
  • High-quality hair towel
  • Hair dryer with nozzle attachment

7. Mocha with Caramel Ribbons

This combination is a classic, combining the earthy, grounding tones of mocha with the sweet, warmth of caramel. The caramel ribbons add a brightness and playfulness to the mocha base, making this a very versatile look that transitions well from the office to a night out. The contrast between the dark mocha and the lighter caramel creates a beautiful, multi-layered look that appears incredibly intricate when styled with loose waves. This style is particularly flattering for those with warm or neutral skin tones, as the caramel highlights bring out the golden flecks in your skin and eyes.

How to Make

After coloring your base with a solid mocha shade, use a highlighting brush to apply a caramel-colored tint to specific sections of your hair. Use a weaving technique to ensure the highlights are well-distributed throughout the hair rather than just sitting on the surface. Focus on the mid-lengths and ends for a more modern, ombre-inspired feel. Once you have applied the caramel ribbons, let them process until they reach the desired level of brightness. Rinse and follow with a color-safe conditioner. To finish, use a curling wand to create soft, defined waves that highlight the beautiful ribbons of caramel throughout the mocha.

Things Needed

  • Rich mocha permanent color
  • Caramel tint for highlights
  • Highlighting brush
  • Color-safe conditioner
  • Curling wand
  • Heat-protective thermal spray
  • Wide-tooth comb

8. Muted Mocha Matte

If you prefer a look that is less about shine and more about sophisticated texture, the muted mocha matte is an excellent choice. This look focuses on a solid, deep mocha base with a matte finish that looks incredibly chic and modern. By avoiding a high-shine gloss, you create a soft, velvety appearance that looks very natural and understated. This is a great choice for those with fine or thinning hair, as the matte finish can make the hair appear denser and fuller. It is a quiet, confident style that feels very Parisian and effortlessly fashionable.

How to Make

Choose a permanent mocha hair dye that is explicitly labeled as “matte” or “neutral,” as these formulas avoid the high-reflect pigments that create a glossy finish. Apply the color evenly from roots to tips, ensuring complete coverage. After rinsing, avoid using shine sprays or oils, as these will counteract the matte effect you are looking for. Instead, use a texturizing spray or a light styling cream when you style your hair, as this will enhance the matte aesthetic and add a bit of grit and volume, making the overall look feel more intentional and cool.

Things Needed

  • Neutral mocha permanent color
  • Texturizing spray
  • Styling cream
  • Tint brush and bowl
  • Plastic gloves
  • Sectioning clips
  • Wide-tooth comb

9. Mocha-Chestnut Hybrid

The mocha-chestnut hybrid is a beautiful blending of two distinct brunette worlds. It takes the deep, coffee-like base of mocha and infuses it with the warm, reddish undertones of chestnut. The result is a vibrant, multi-tonal shade that looks different depending on the lighting. Under indoor light, it appears as a deep, rich mocha, but in the sun, the chestnut undertones really pop, adding warmth and radiance. This is a fantastic option for those who cannot decide between a cool and a warm look, as it provides a bit of both, creating a highly sophisticated and customized color result.

How to Make

Mix a deep mocha base color with a small amount of warm chestnut tint. The key is to keep the mocha as the dominant color, using the chestnut as an enhancer. Apply the mixture throughout your hair, focusing on the ends, which should show off more of the chestnut warmth. After rinsing, use a color-protecting shampoo that is specifically designed for warm brown tones. This will ensure that the chestnut undertones stay vibrant and do not get washed out or lose their warmth over time, keeping your hybrid mocha-chestnut hair looking fresh and multi-dimensional.

Things Needed

  • Deep mocha base dye
  • Warm chestnut tint
  • Color-protecting shampoo
  • Tint brush
  • Mixing bowl
  • Detangling brush
  • Microfiber towel

10. Mocha Ombre Elegance

Mocha ombre elegance is a striking and bold take on the mocha trend. It features a dark, rich mocha root that gradually fades into a significantly lighter, almost café-au-lait mocha on the ends. The transition is smooth and intentional, creating a dramatic yet sophisticated look that is perfect for those who love a bit of flair. Because the lighter color is concentrated at the ends, you can afford to be a bit more adventurous with the lightness, creating a beautiful contrast that highlights your hair’s length and movement. It is a stunning, high-impact style that is surprisingly easy to manage.

How to Make

Start by applying your darkest mocha color to the root area, extending down to about mid-ear level. Then, apply a much lighter mocha shade to the remaining ends. Use your fingers or a blending brush to smudge the line where the two colors meet, creating a soft, blurred transition. The key to successful ombre is the blur; the more you blend, the more natural the result. Once finished, rinse and follow with a deep conditioning treatment to ensure the lighter ends are hydrated. Because the lighter color is only on the ends, you can easily trim them as they grow, maintaining the look effortlessly.

Things Needed

  • Dark mocha permanent color
  • Light café-au-lait mocha dye
  • Blending brush
  • Deep conditioning mask
  • Sectioning clips
  • Heat-styling tool
  • Finishing spray

Conclusion

Soft mocha hair offers a unique blend of sophistication, versatility, and ease that makes it a top-tier choice for any season. By focusing on the nuances of your own hair texture and your specific skin tone, you can adapt these mocha variations to create a look that feels uniquely yours. Whether you choose a high-gloss finish, a matte texture, or a playful blend of highlights, the beauty of this color palette lies in its grounding, natural warmth. Investing in the right color-safe products and maintaining your hair’s health through hydration will ensure that your mocha hue remains rich, vibrant, and incredibly chic. Take these ideas as a starting point and work with your stylist to find the perfect shade of mocha that reflects your personal style and enhances your natural beauty. Your journey toward a more polished and radiant hair color starts with the timeless, inviting tones of soft mocha.

•

Leave a Reply

Your email address will not be published. Required fields are marked *